User Guide
This guide walks through how to create, configure, test, and publish an eligibility screener using Benefit Decision Toolkit (BDT).
1. Screener Projects
Section titled “1. Screener Projects”After signing in, you will land on the Screeners view. This page displays all of your existing screener projects and serves as your starting point for creating and managing screeners.
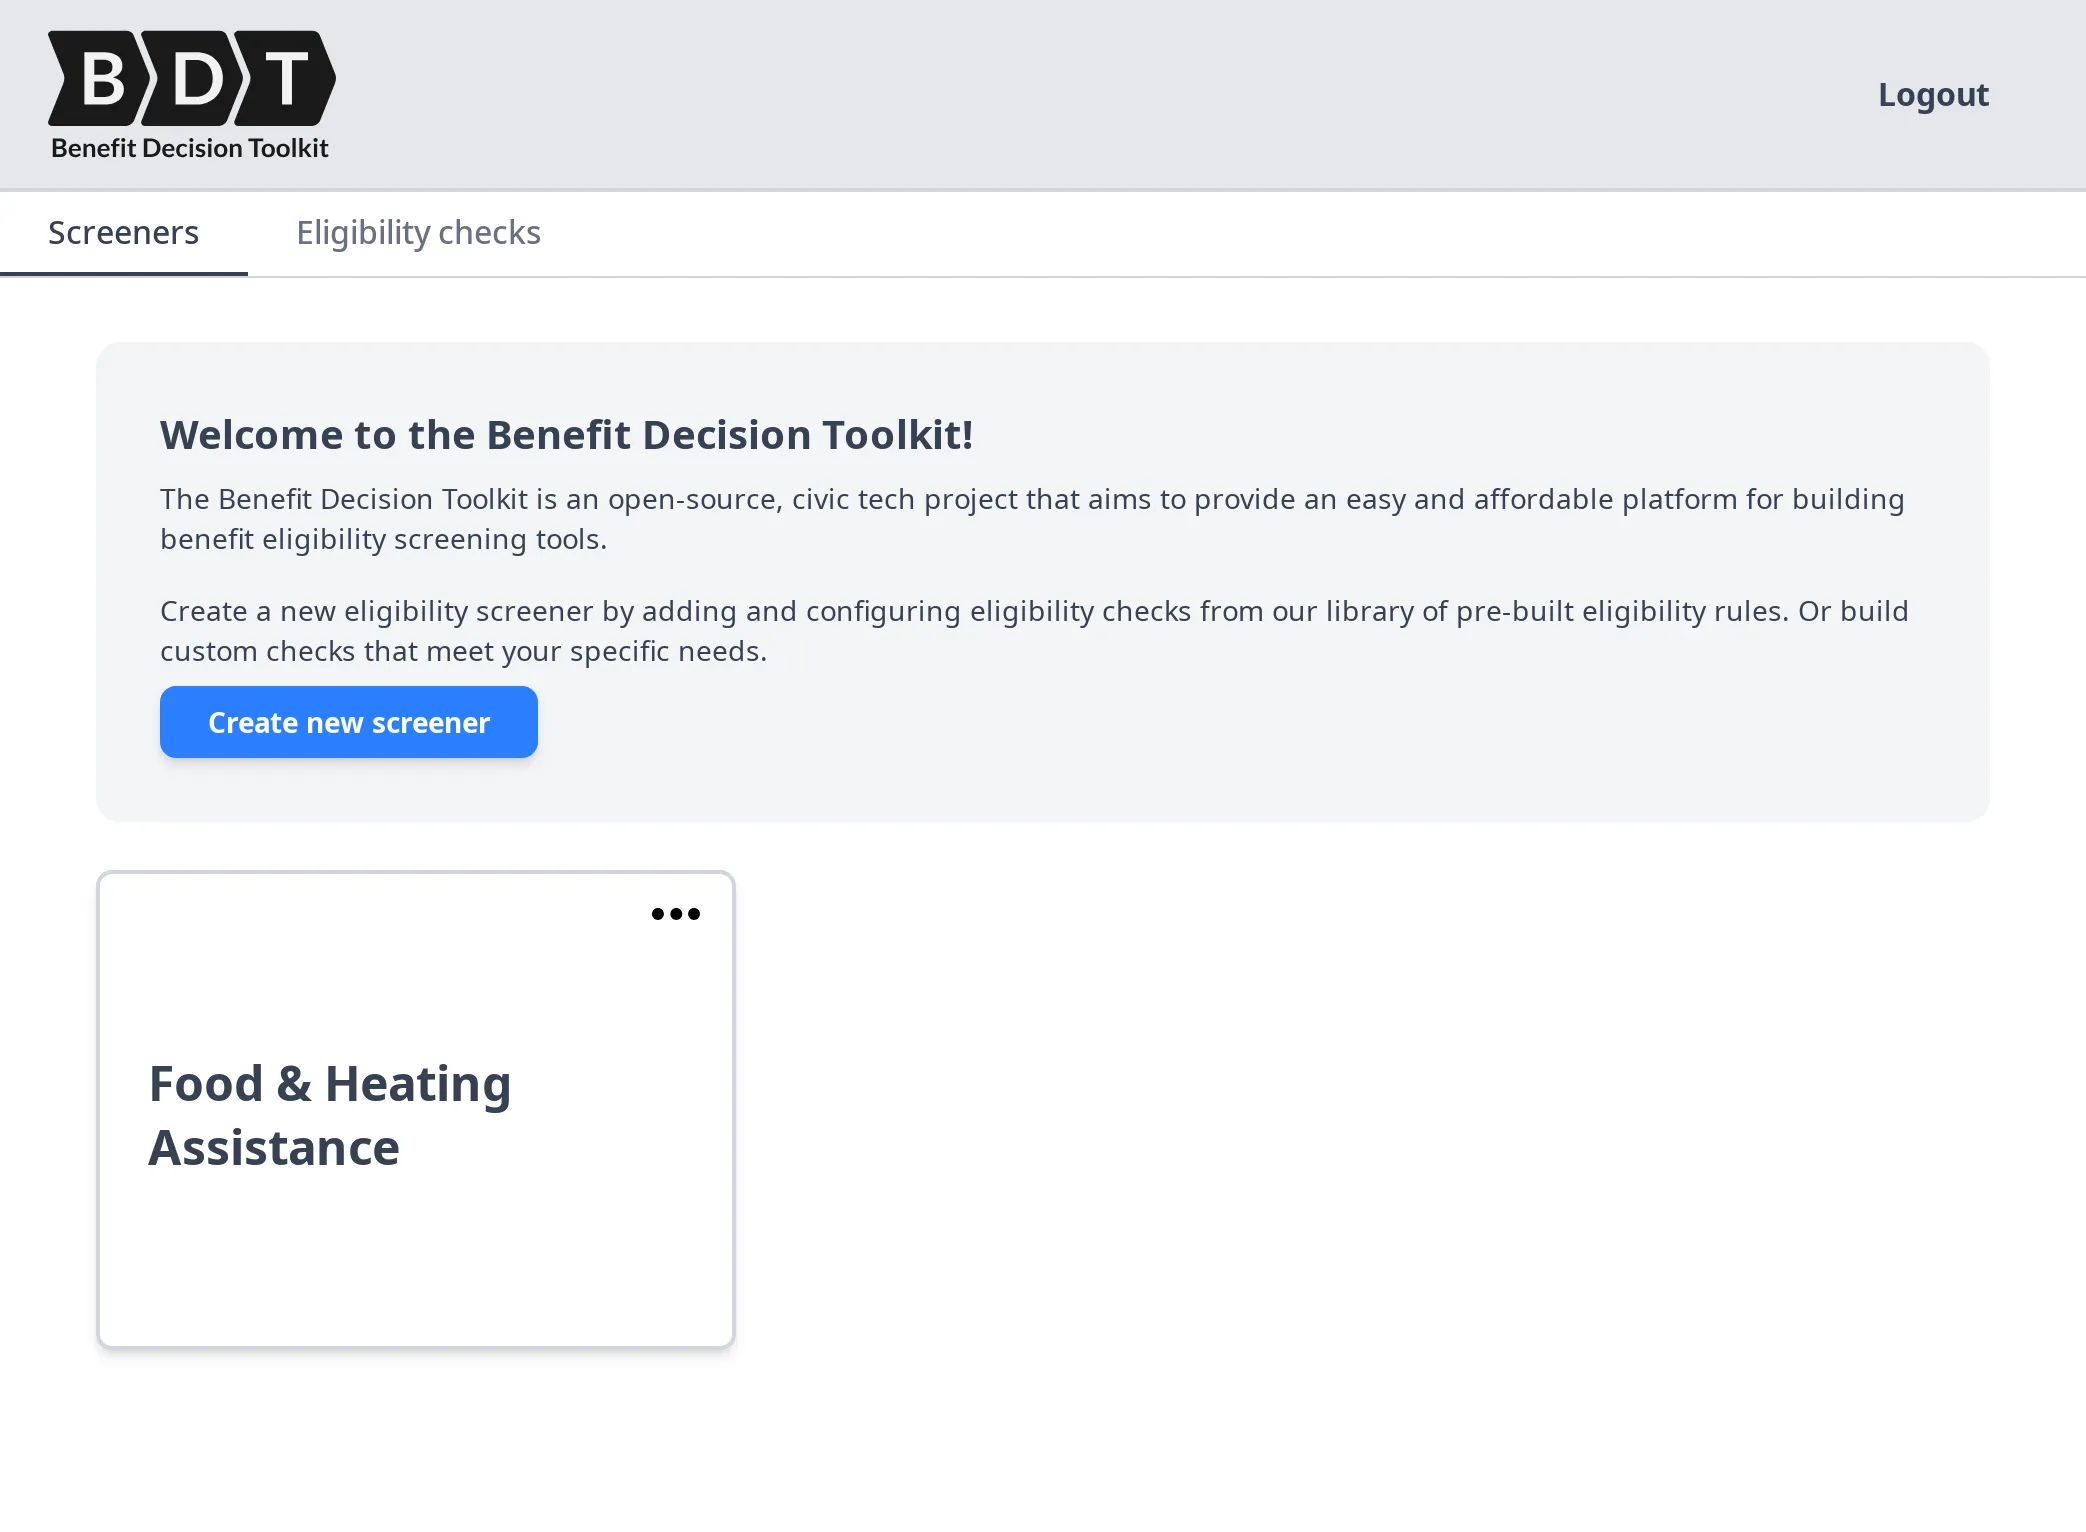
From here, you can:
- View all of your existing screeners
- Open and edit a screener
- Create a new screener project
Creating a new screener:
Select Create New Screener and provide a name for your screener. The name should clearly reflect the benefit or set of benefits being screened (for example, “Philadelphia Senior Benefits” or “Housing Assistance Eligibility”).
After the screener is created, you are automatically taken to the Screener Dashboard.
2. The Screener Dashboard
Section titled “2. The Screener Dashboard”When you open a screener project, you are taken to the Screener Dashboard — the central workspace for building and managing your screener.
At the top of the page, the navigation bar contains four tabs representing the main stages of screener development:
- Manage Benefits — define the eligibility logic for each benefit your screener evaluates
- Form Editor — build the user-facing form that collects applicant information
- Preview — test the screener end-to-end before publishing
- Publish — deploy your screener to a public URL
Work through these tabs in order when building a screener for the first time. The eligibility logic you define in Manage Benefits informs what inputs the Form Editor needs to collect, and both must be complete before Preview and Publish are meaningful.
3. Defining Eligibility Logic (Manage Benefits)
Section titled “3. Defining Eligibility Logic (Manage Benefits)”The Manage Benefits tab is where you define the eligibility logic used by your screener.
In BDT, a Benefit is a named configuration that evaluates whether a user qualifies for a specific program. When a user submits the screener form:
- BDT collects the user’s inputs from the form.
- Each configured Benefit evaluates those inputs against its eligibility rules.
- Each Benefit returns an eligibility result.
- The results are displayed to the user on the form’s results screen.
A single screener can evaluate eligibility for one or multiple benefits. Each benefit’s logic is defined independently, which allows a screener to assess users for several related programs while keeping the eligibility rules for each benefit separate and manageable.
3.1 Manage Benefits Overview
Section titled “3.1 Manage Benefits Overview”The Manage Benefits tab displays all benefits configured for your screener as a list of cards.
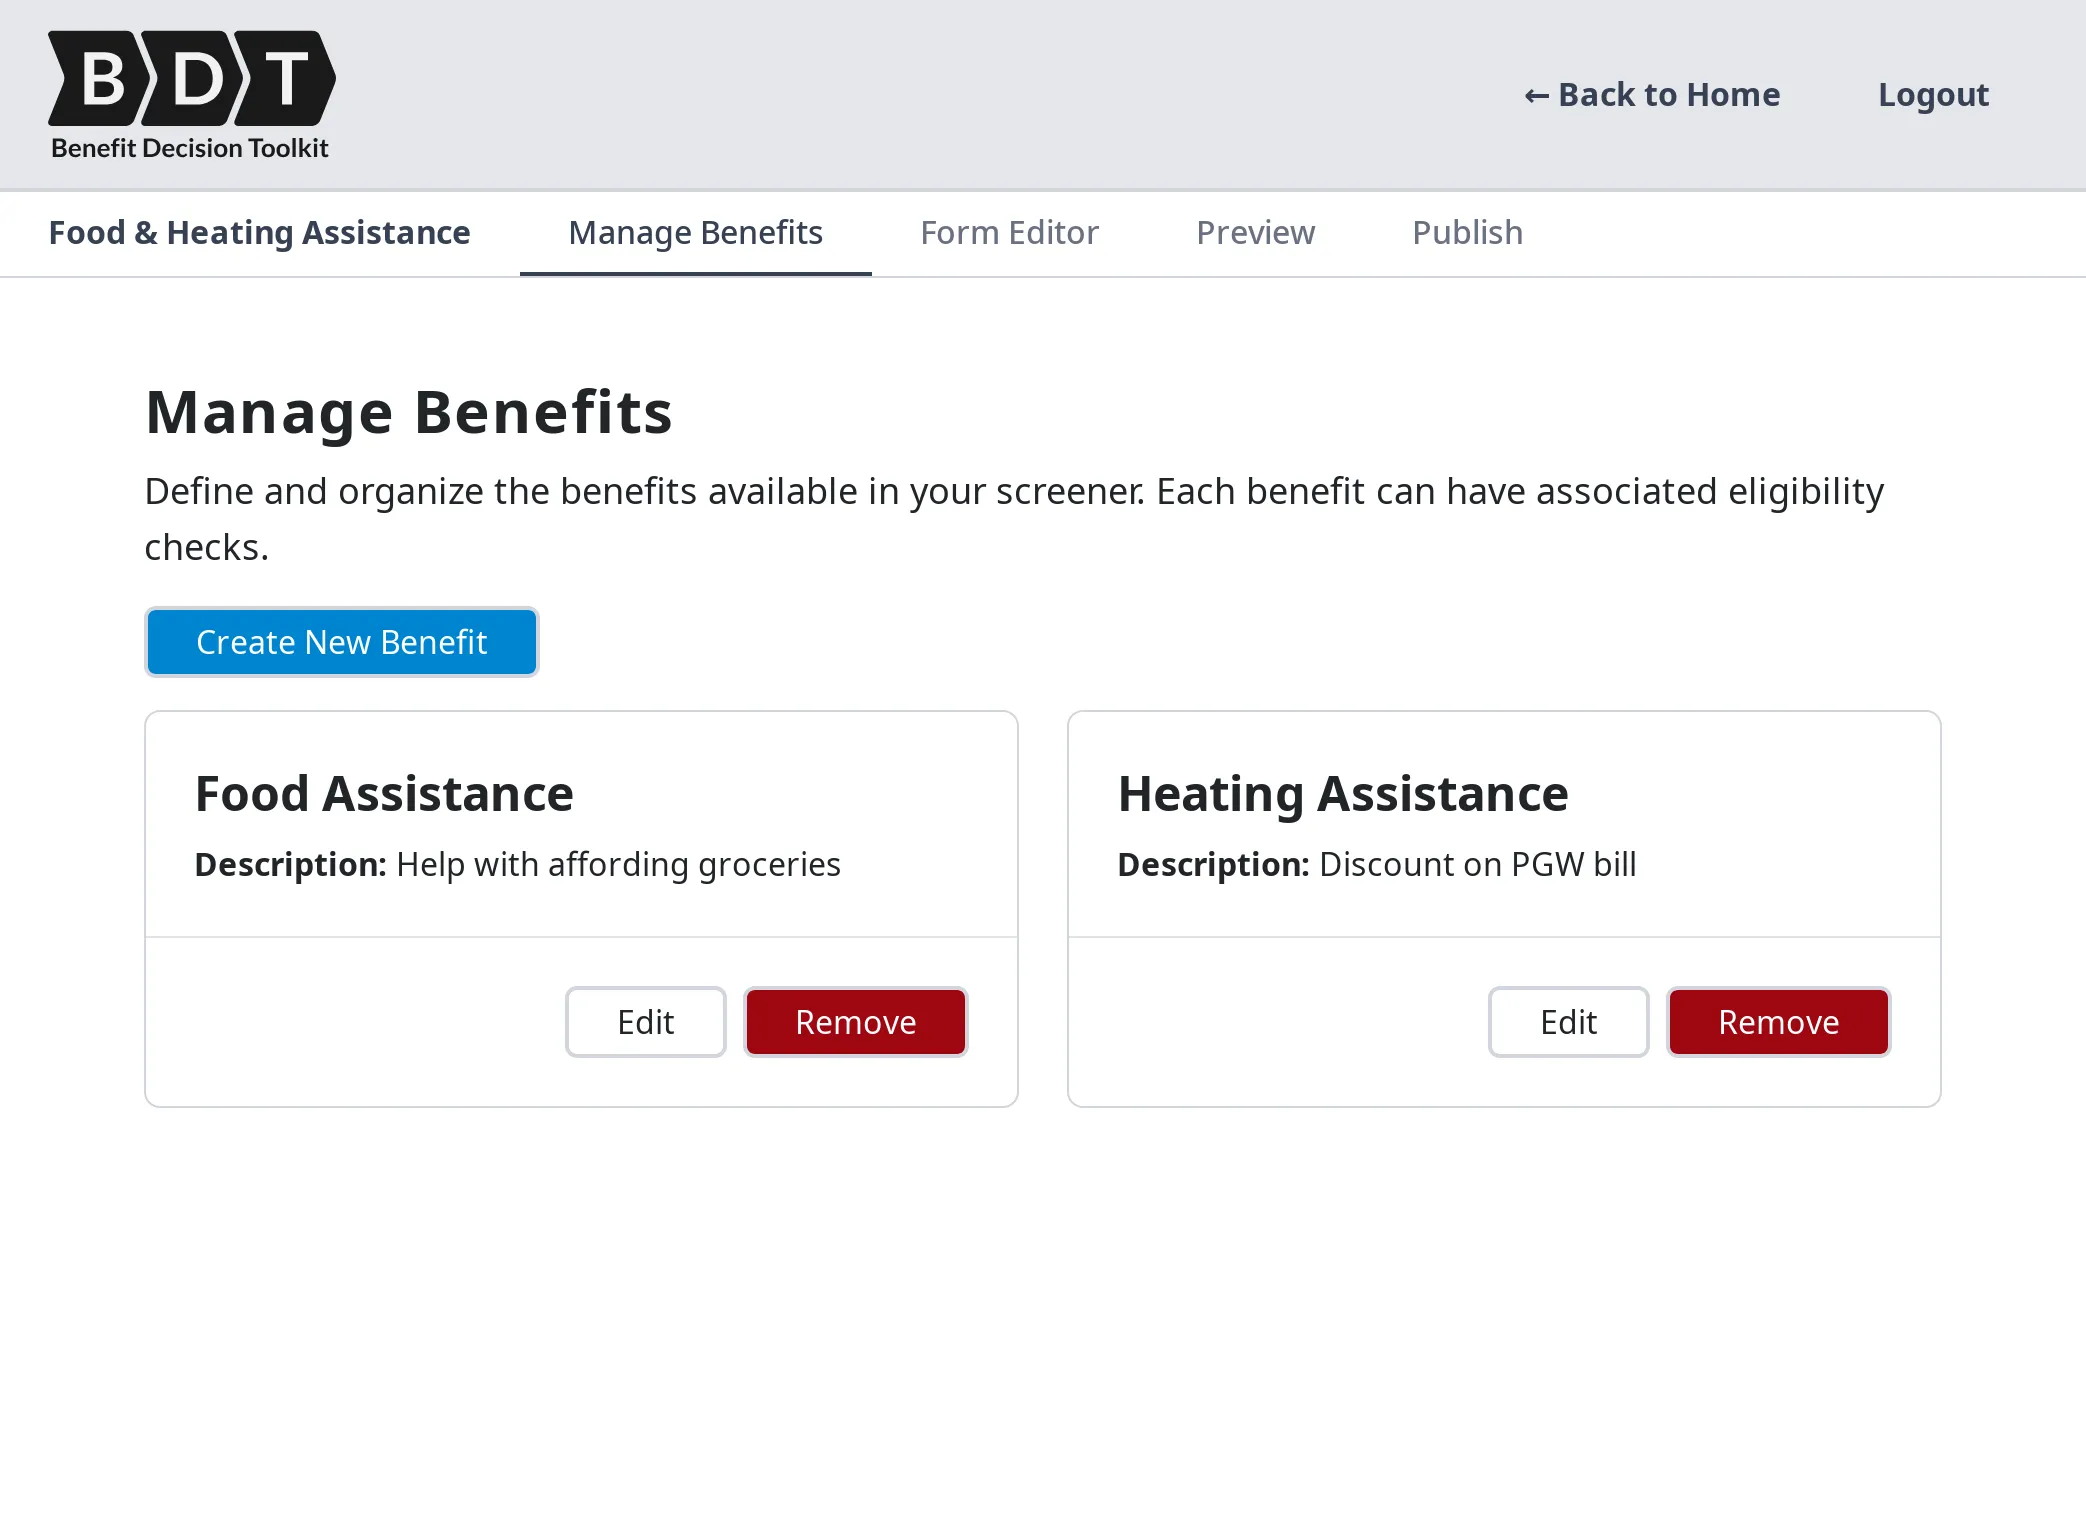
From this view, you can:
- Create a new benefit by selecting Create New Benefit and providing a name and description
- Edit a benefit by selecting Edit on its card, which opens the Configure Benefit page
- Remove a benefit by selecting Remove on its card
4. Configuring a Benefit
Section titled “4. Configuring a Benefit”The Configure Benefit page is where you define the rules that determine whether a user qualifies for a specific benefit. You access it by selecting Edit on any benefit card.
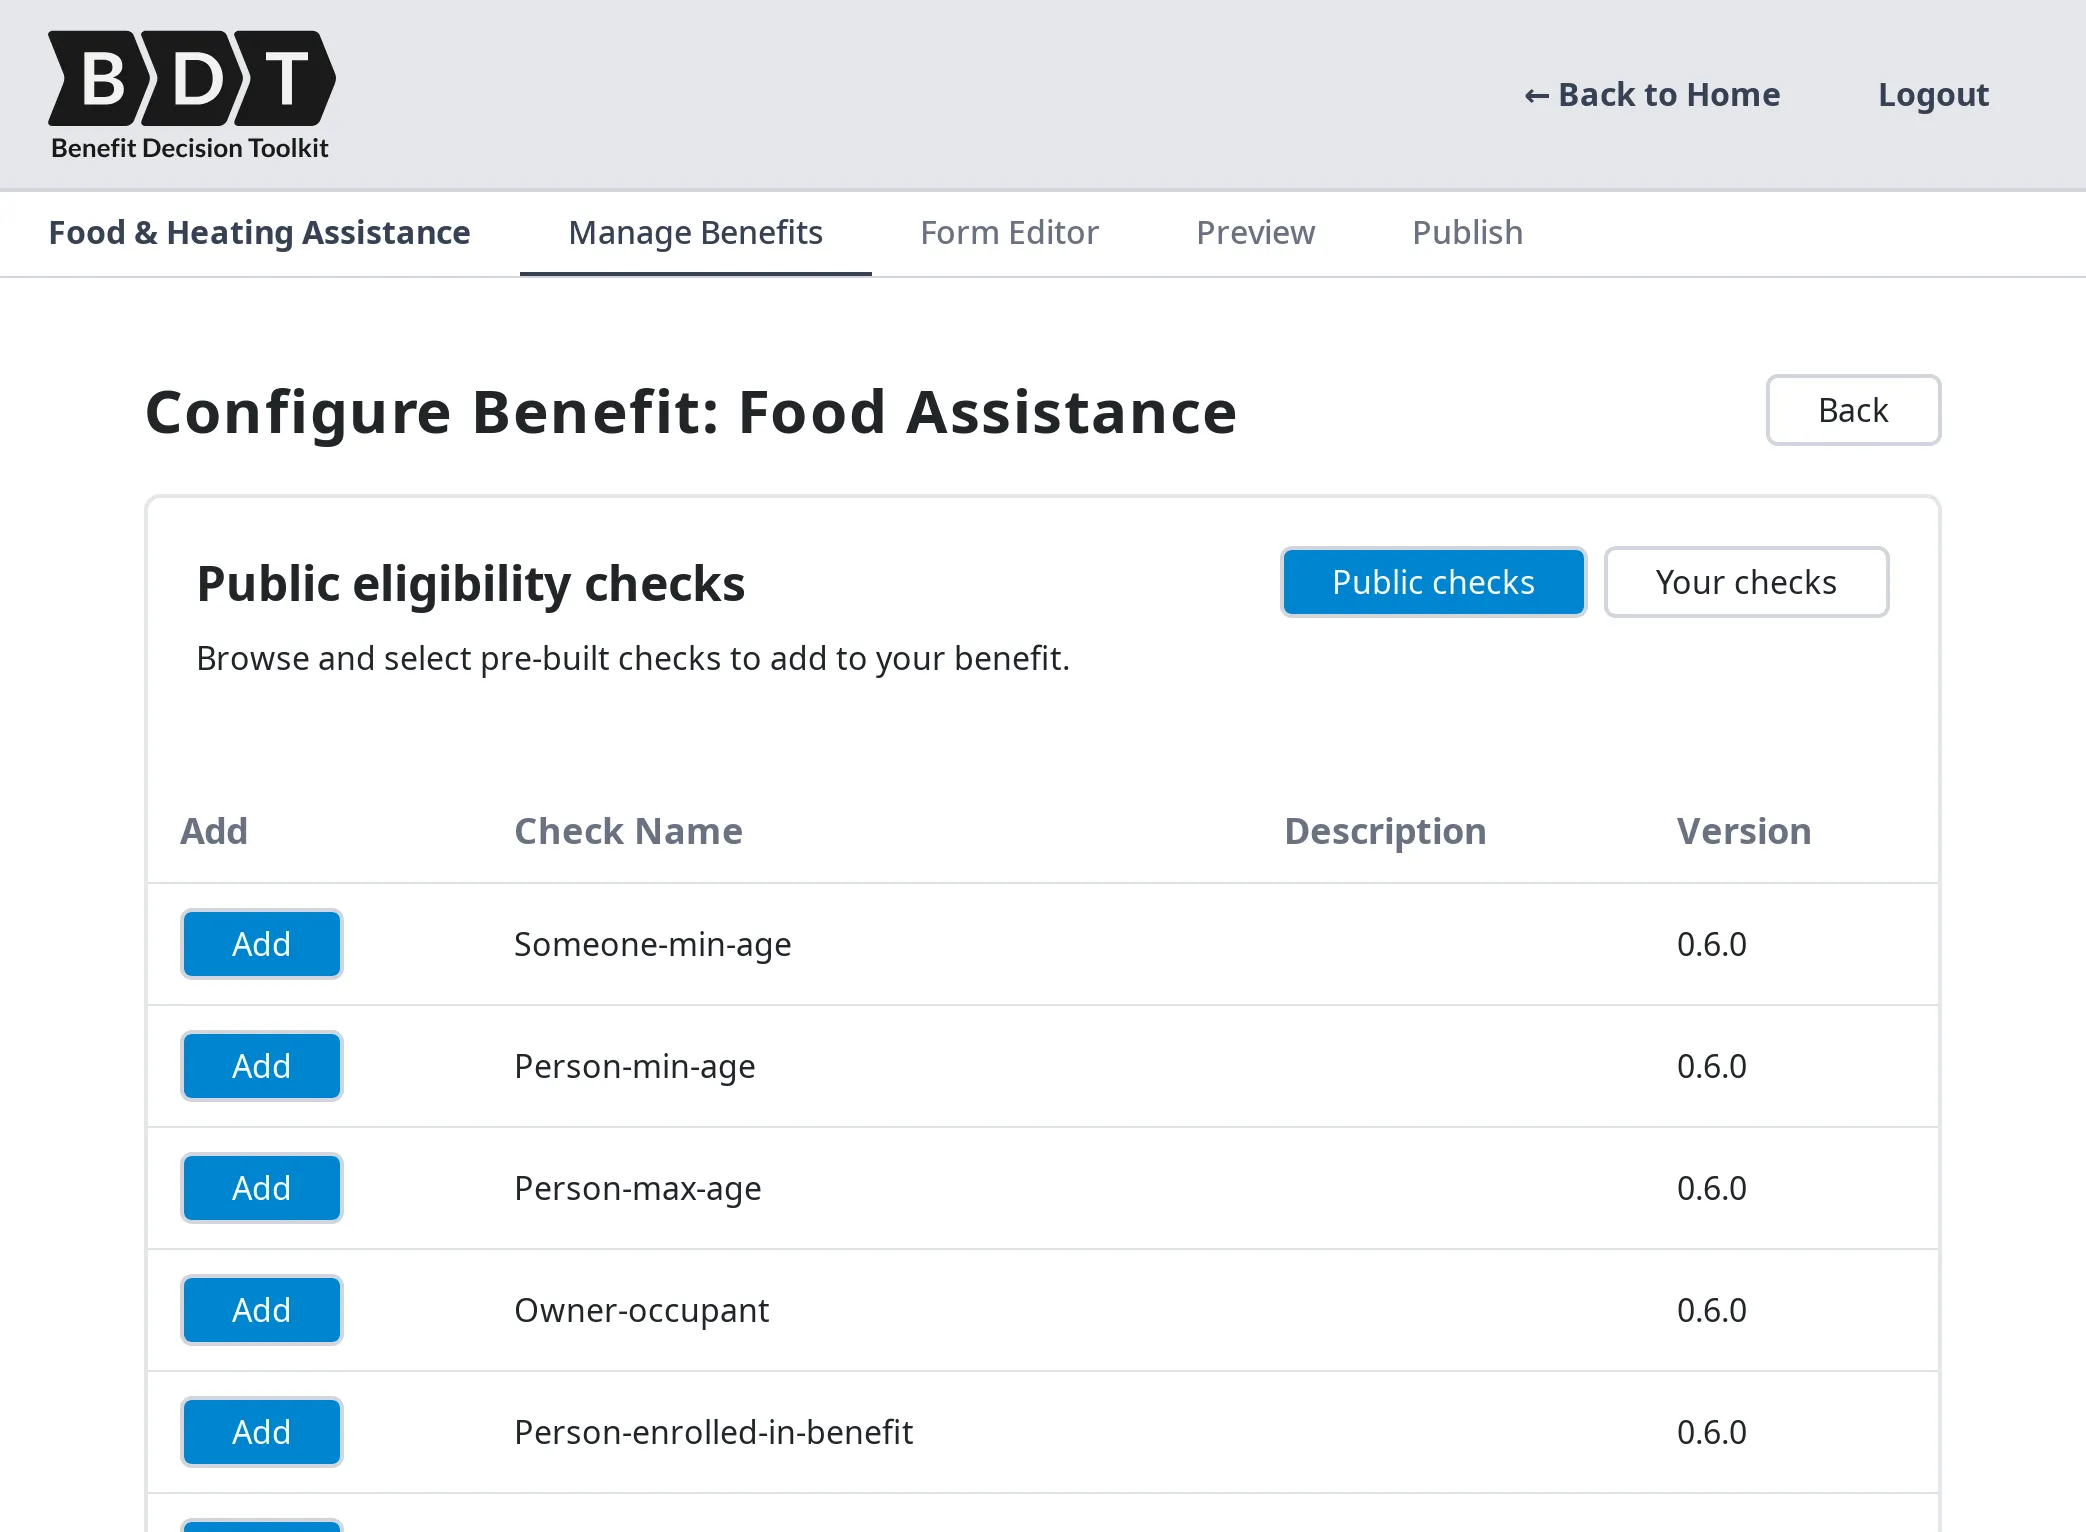
Each benefit contains one or more Eligibility Checks.
A user is considered eligible for the benefit only if every eligibility check evaluates to
True.
4.1 What Is an Eligibility Check?
Section titled “4.1 What Is an Eligibility Check?”An Eligibility Check is a reusable rule component that:
- Accepts one or more inputs (from the screener form or from configured parameters)
- Evaluates a defined condition
- Returns a boolean result (
TrueorFalse)
By adding multiple eligibility checks to a benefit, you define the complete set of criteria a user must meet to qualify.
Example:
Suppose a benefit requires that applicants be at least 65 years old and live in the state of Pennsylvania. You could configure:
- A Minimum Age check with a minimum age parameter of
65 - A State of Residence check with a state parameter of
Pennsylvania
If both checks return True, the user is eligible for the benefit. If either check returns False, the user is not eligible.
4.2 Adding Eligibility Checks
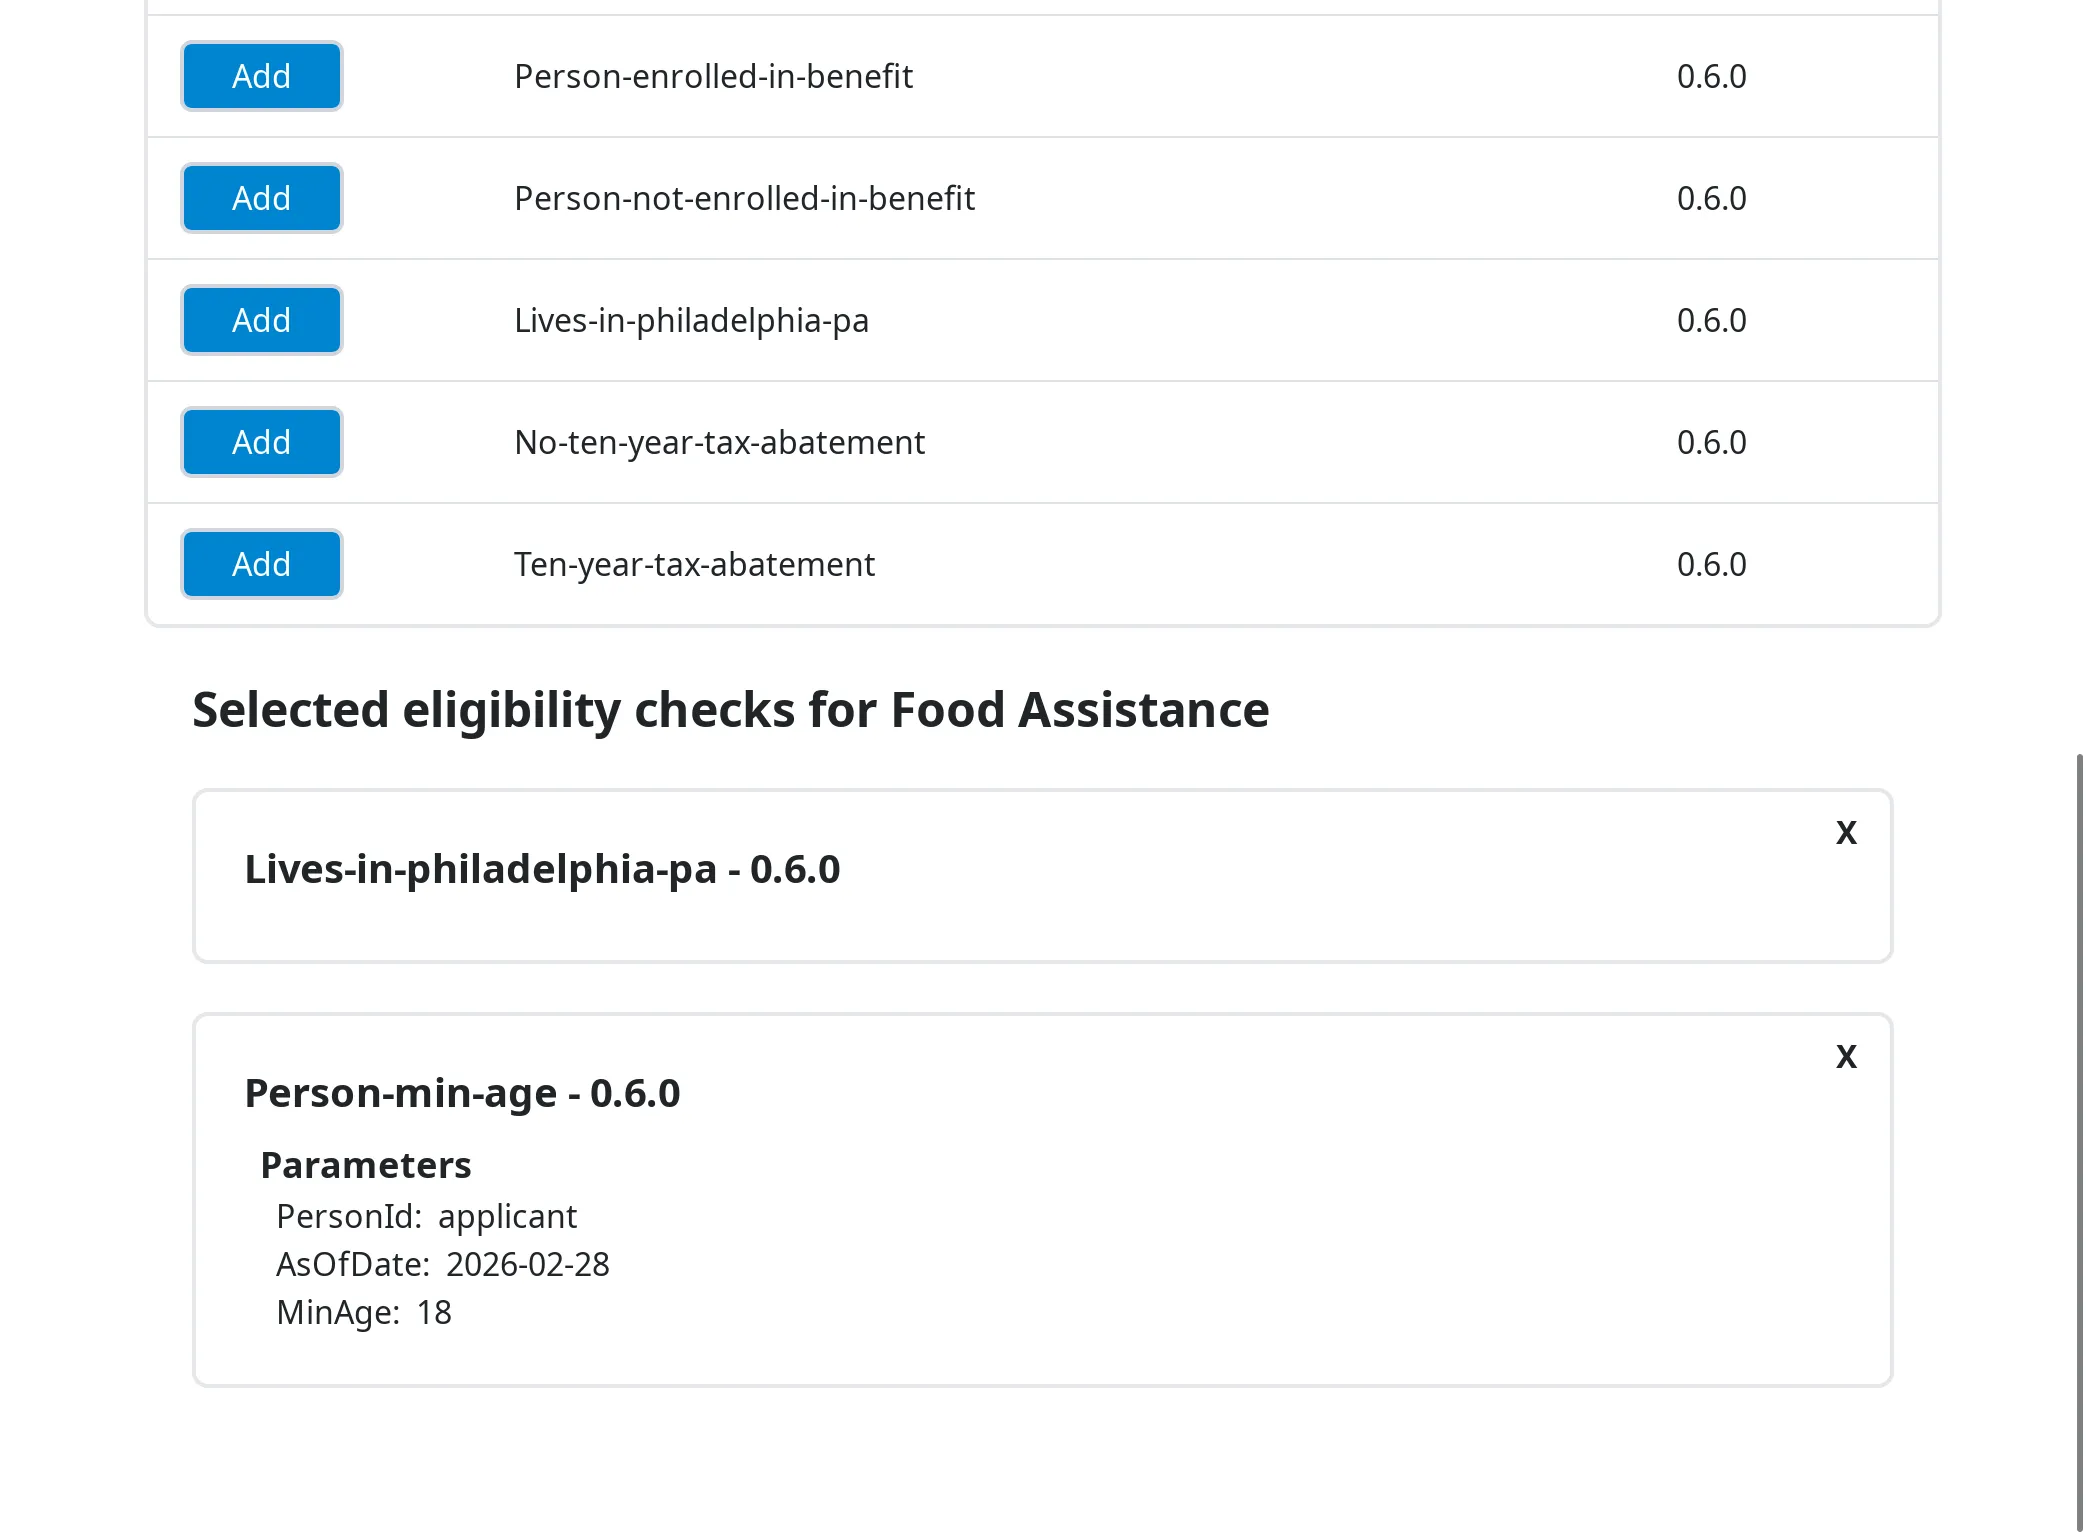
Section titled “4.2 Adding Eligibility Checks”The left side of the Configure Benefit page displays the list of available eligibility checks. Checks are organized into two categories:
- Public Checks — prebuilt checks available to all BDT users
- Your Checks — custom checks that you have created and published
Each row in the list shows the check name, a brief description, and its version. Select Add on any row to add that check to the benefit.
Once added, the check appears as a card in the right panel under the benefit’s configured checks.
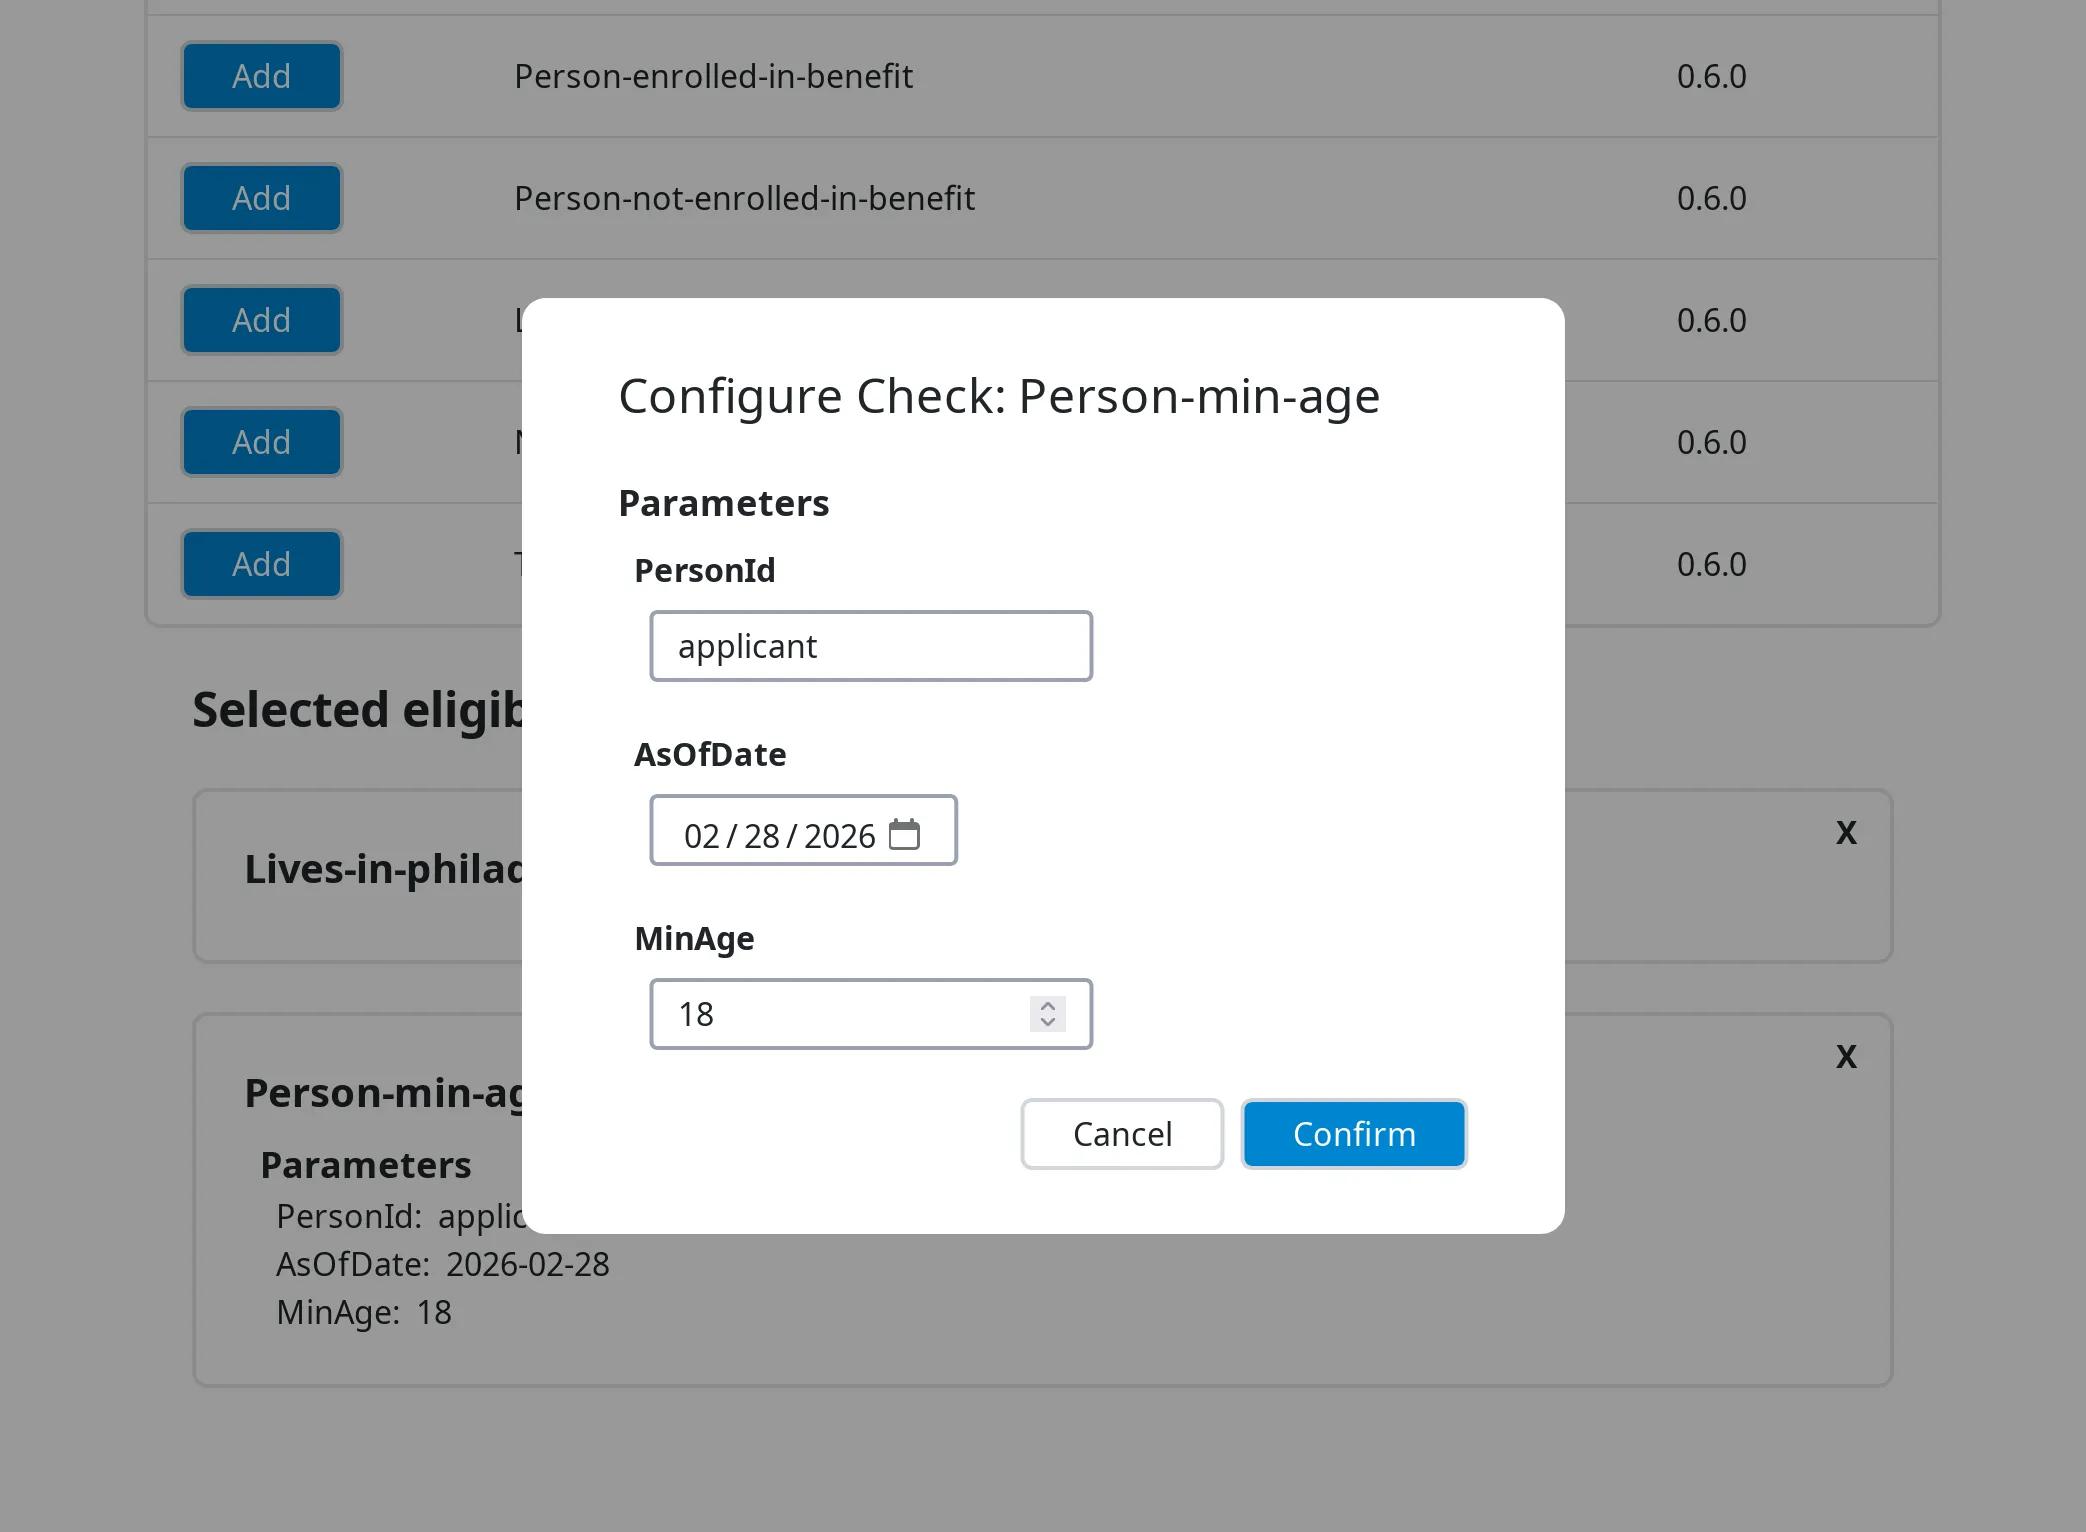
4.3 Configuring Check Parameters
Section titled “4.3 Configuring Check Parameters”Many eligibility checks have parameters — configurable values that control how the check evaluates eligibility. Parameters allow the same check logic to be reused across multiple benefits with different thresholds.
Example: A Household Income Limit check might have a maximumIncome parameter. You set it to 20000 for one benefit and 35000 for another. The underlying rule is the same; only the threshold differs.
To configure the parameters for an added check, click on its card in the right panel. A modal will open showing a form with all of that check’s configurable parameters.
Fill in the value for each parameter and select Confirm to save. Required parameters are marked with a red asterisk (*).
4.4 Removing a Check
Section titled “4.4 Removing a Check”To remove an eligibility check from a benefit, select the X button in the top-right corner of that check’s card in the right panel.
5. Building the Form (Form Editor)
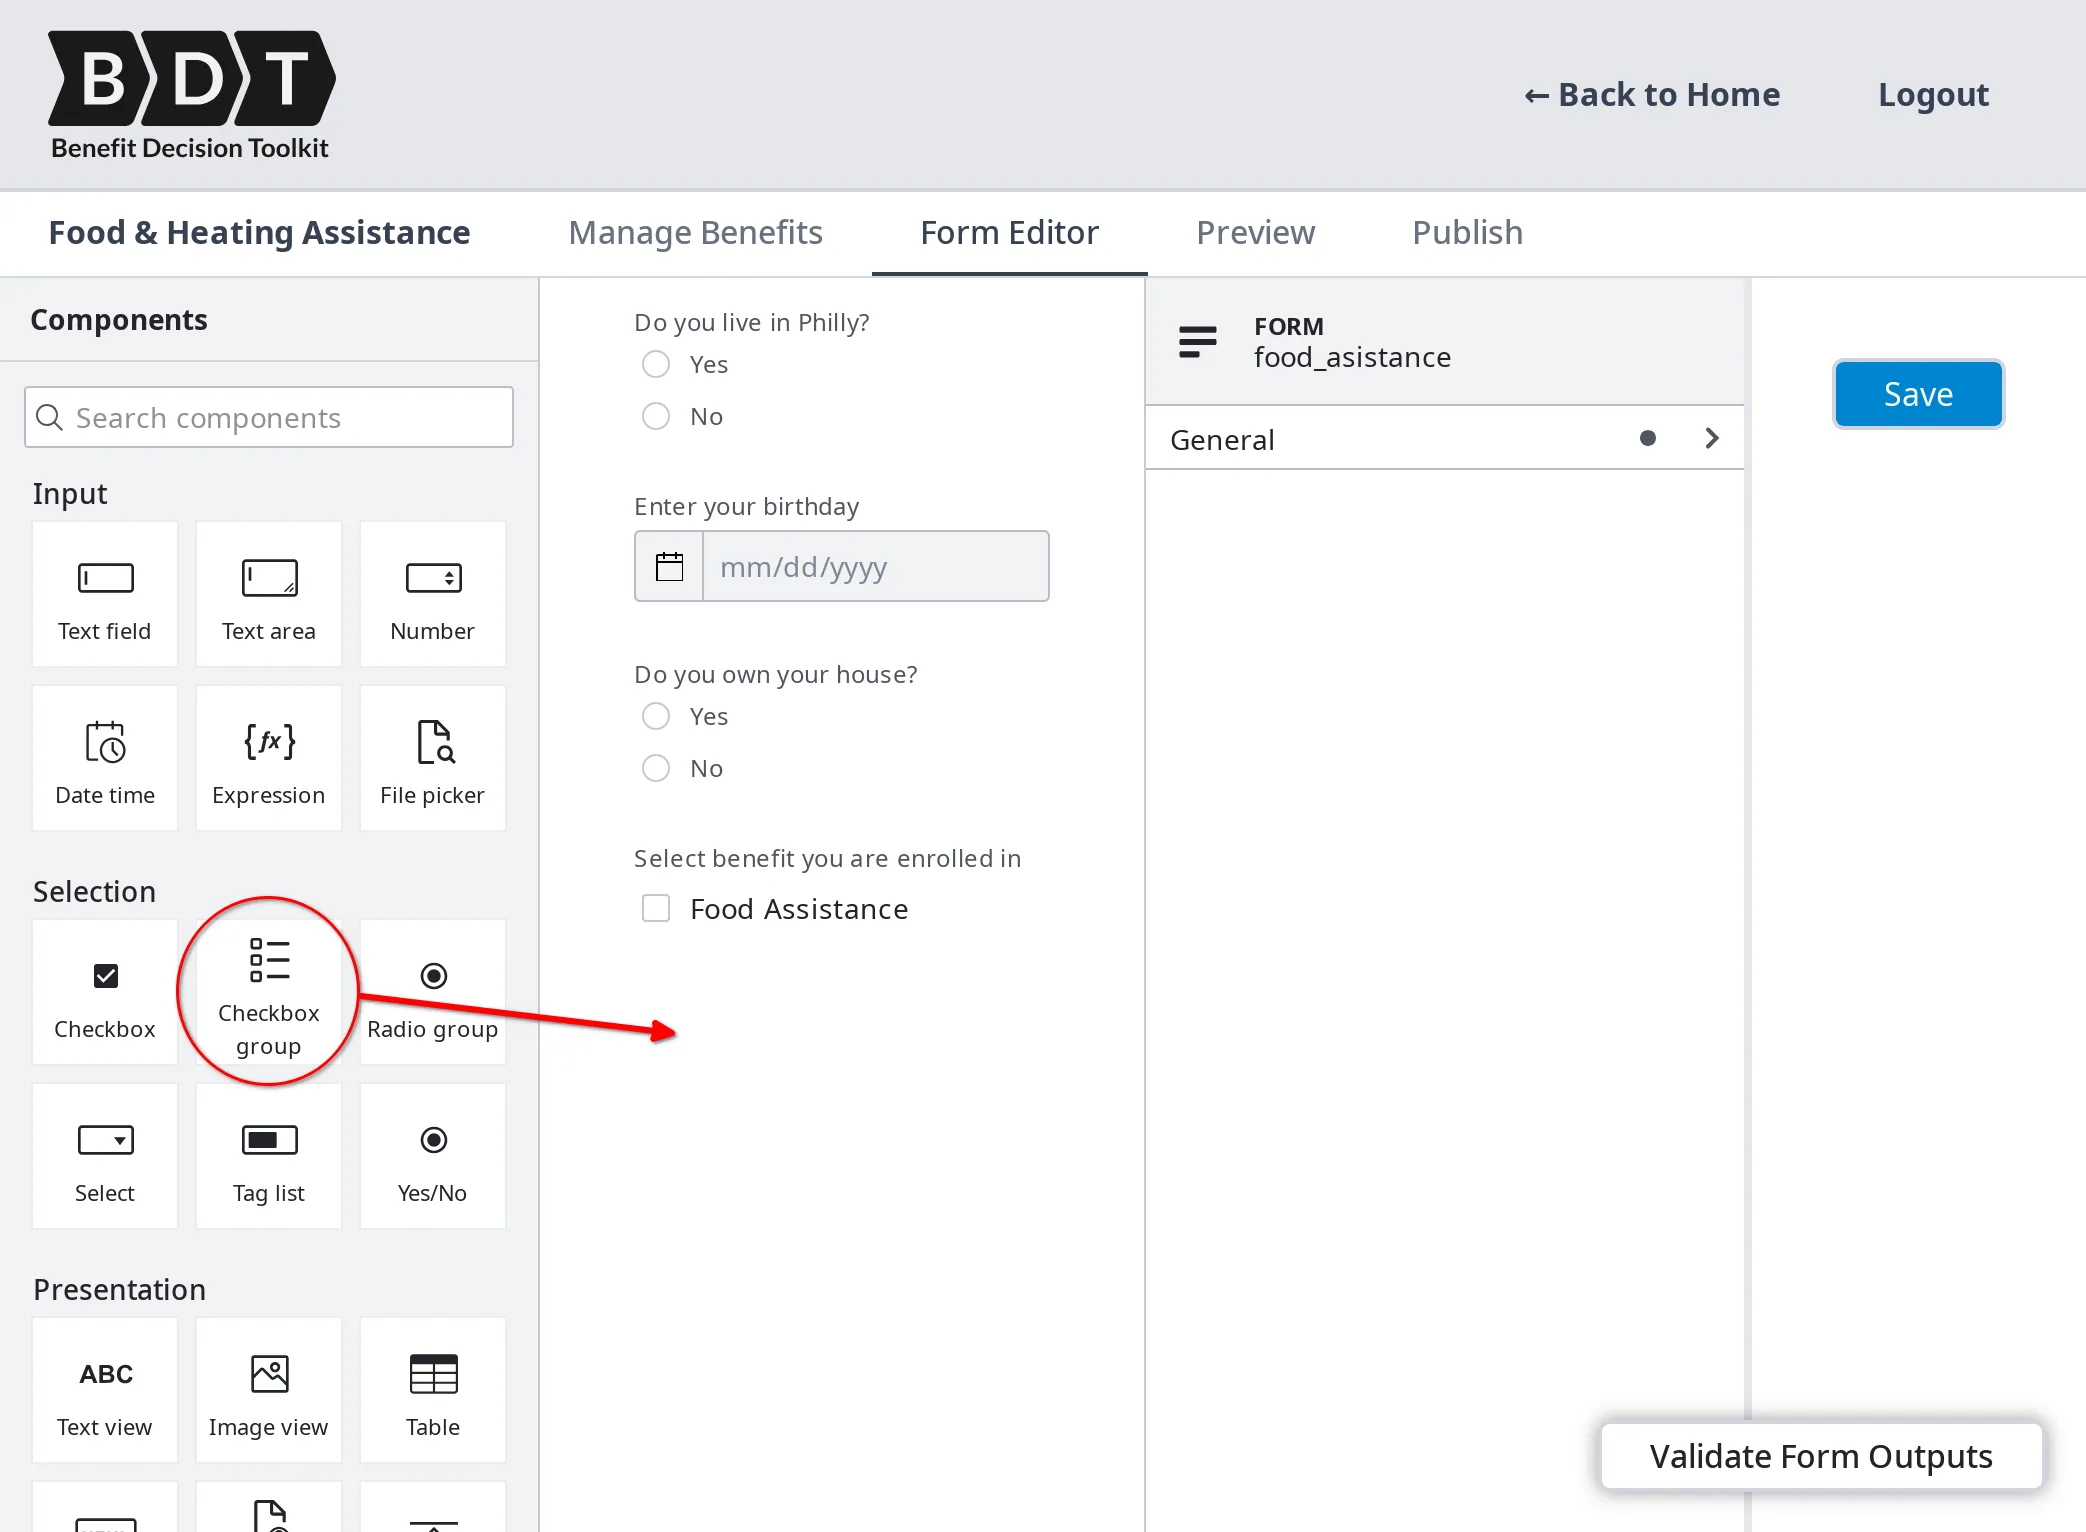
Section titled “5. Building the Form (Form Editor)”The Form Editor tab is where you build the user-facing form that collects the information needed to evaluate eligibility.
The editor provides a visual drag-and-drop canvas powered by Form-JS. You can add, arrange, and configure form fields without writing any code.
Saving your work:
Select Save to persist your form. The save button turns yellow when there are unsaved changes, so you can tell at a glance whether your current edits have been saved.
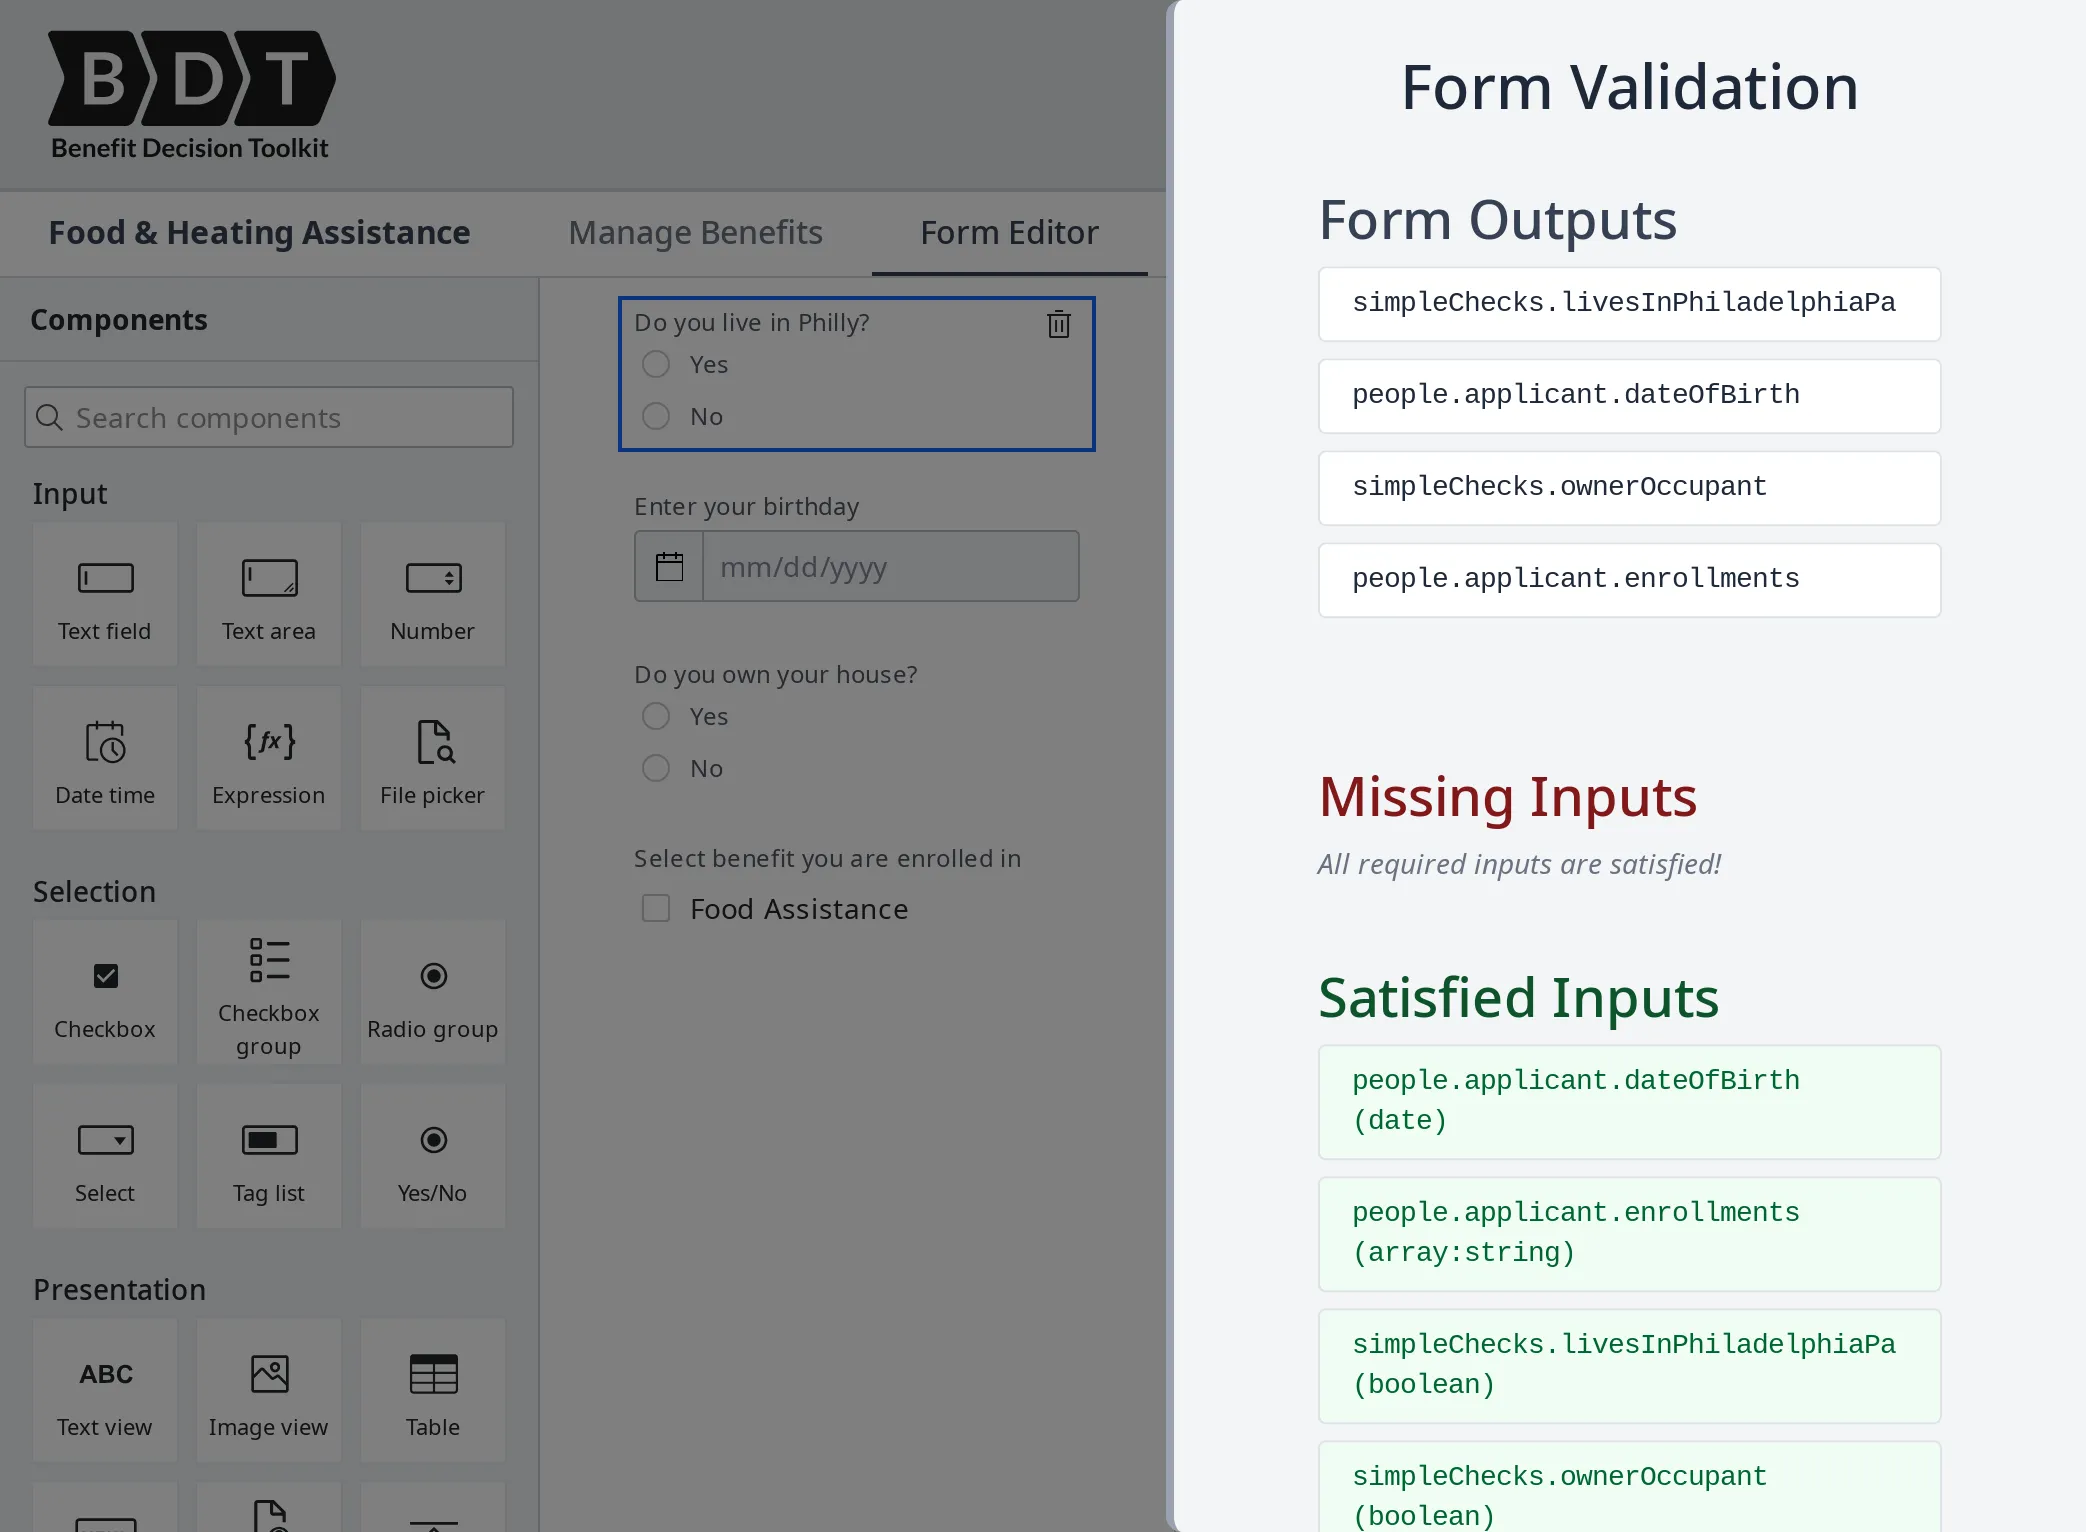
5.1 Connecting Form Fields to Eligibility Checks
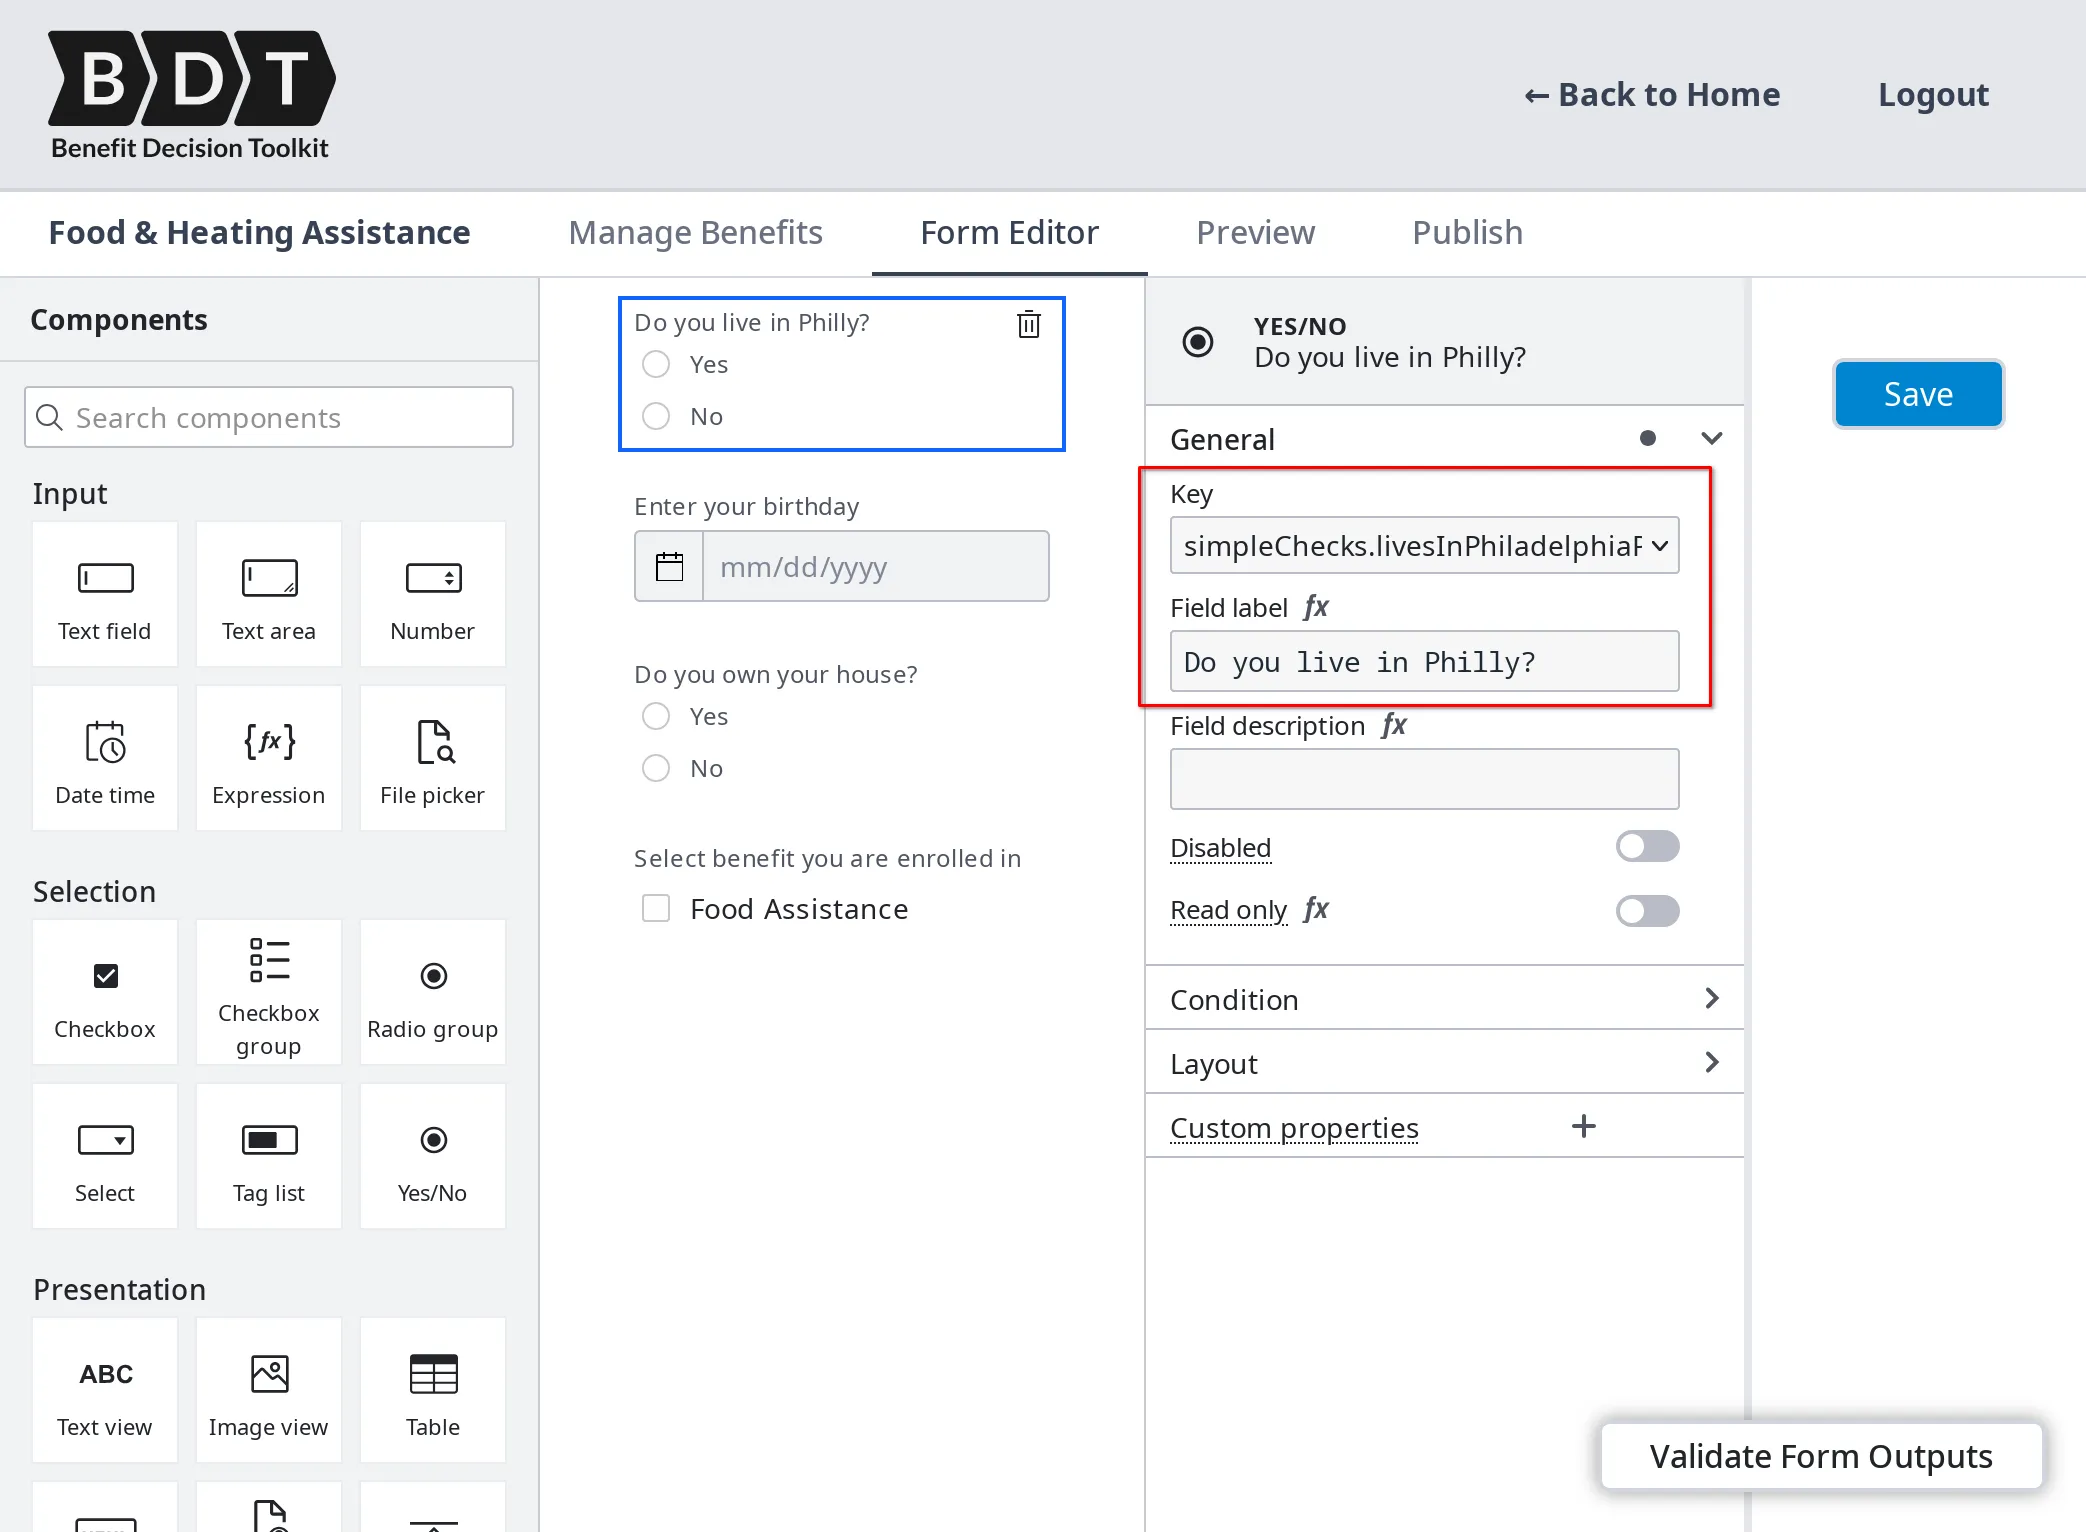
Section titled “5.1 Connecting Form Fields to Eligibility Checks”For the screener to evaluate eligibility correctly, the form must collect all of the inputs that the configured eligibility checks require. Each form field has a key that identifies the data it collects — this key must match the input name expected by the corresponding eligibility check.
The Validate Form Outputs drawer (accessible via a button at the bottom-right of the editor) helps you verify that your form covers all required inputs. It shows:
- Form Outputs — a list of all fields currently defined in the form and the data they will collect
- Missing Inputs — inputs required by your eligibility checks that the form does not yet provide (shown in red)
- Satisfied Inputs — required inputs that are already covered by form fields (shown in green)
Use this drawer to identify gaps between your form and your eligibility logic, and resolve any missing inputs before moving to the Preview step.
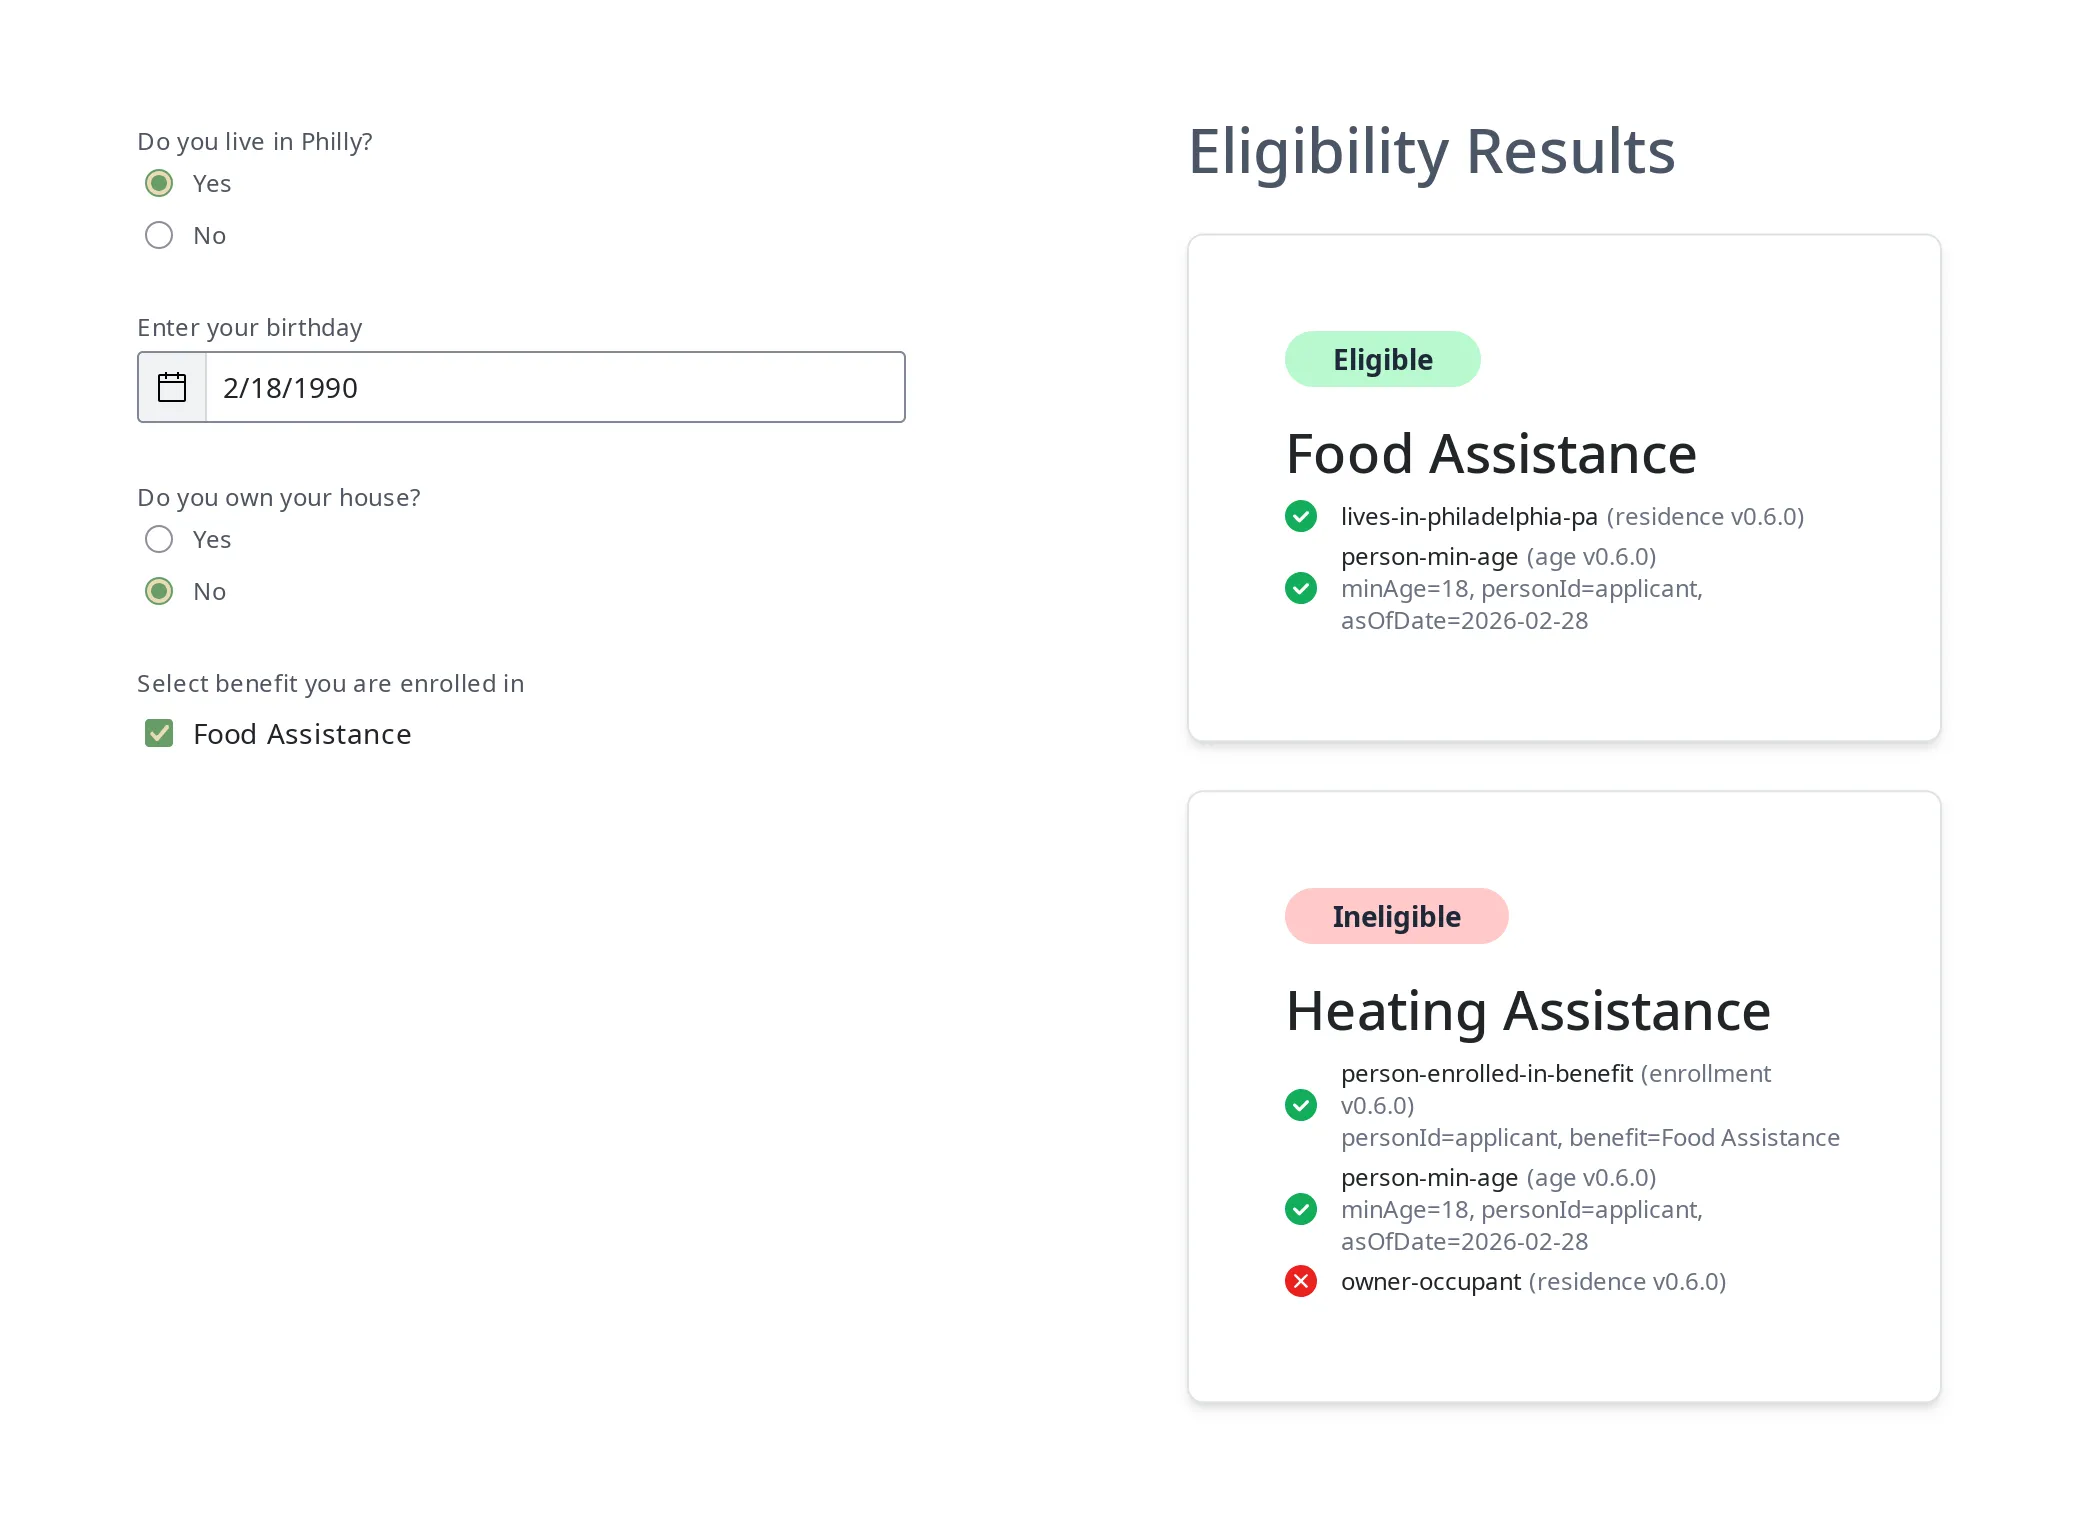
6. Previewing Your Screener
Section titled “6. Previewing Your Screener”The Preview tab provides a live test environment where you can interact with your screener exactly as an end user would, and verify that the eligibility logic produces the correct results.
The preview screen is divided into two sections:
Form section:
Displays your screener form as it will appear to end users. Fill in the fields and select Submit to run the eligibility evaluation.
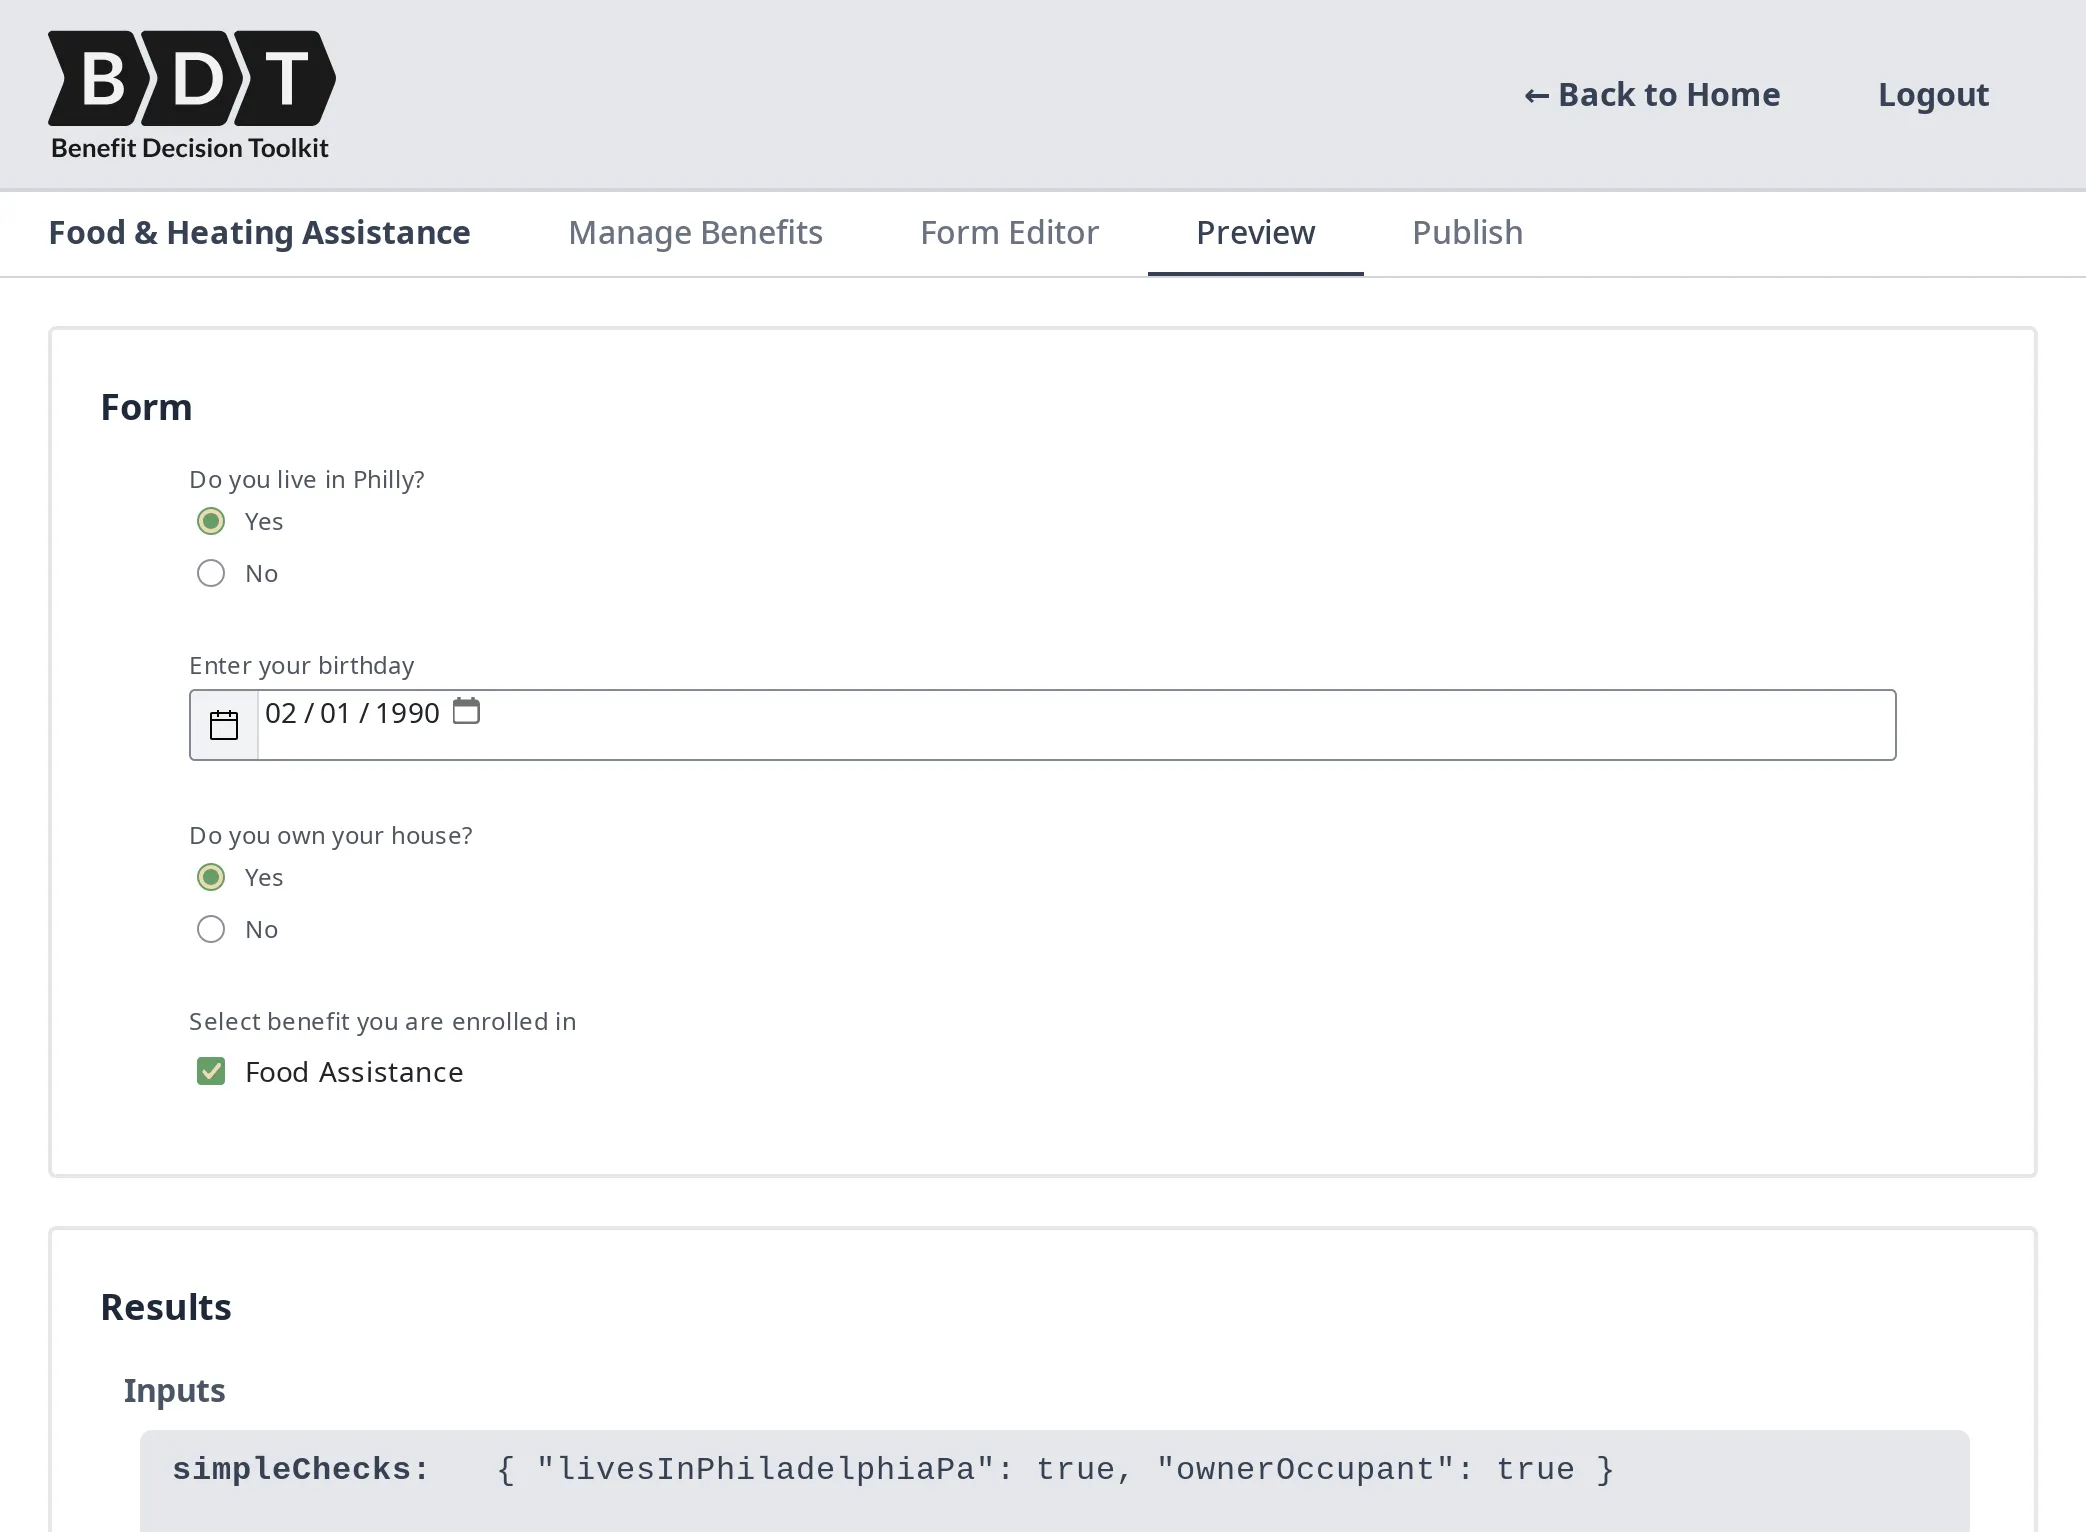
Results section:
After submitting, the results section displays the outcome for each benefit:
- Eligible (green) — all eligibility checks for the benefit returned
True - Ineligible (red) — one or more eligibility checks returned
False - Need more information (yellow) — one or more checks could not determine eligibility from the inputs provided
![Results section of a benefits eligibility tool. The Inputs section shows the following data: simpleChecks: { "livesInPhiladelphiaPa": true, "ownerOccupant": true }, people: { "applicant": { "dateOfBirth": "1990-02-01", "enrollments": [ "Food Assistance" ] } }. The Benefits section shows the following eligibility results: Food Assistance: Eligible, lives-in-philadelphia-pa (residence v0.6.0), person-in-phil-age (age v0.6.0), minAge=18, personId=applicant, asOfDate=2026-02-28. Heating Assistance: Eligible, person-enrolled-in-benefit (enrollment v0.6.0), personId=applicant, benefit=Food Assistance, person-min-age (age v0.6.0), minAge=18, personId=applicant, asOfDate=2026-02-28, owner-occupant (residence v0.6.0).](/_astro/preview-results.Cw-qRE-j_nNJBo.webp)
Each benefit’s result also shows a breakdown of how each individual eligibility check evaluated, including whether it passed, failed, or was unable to determine, and what parameter values were used. This detail is useful for debugging eligibility logic during development.
Use the Preview tab iteratively as you build your screener to confirm that each benefit evaluates correctly across a range of test inputs.
7. Publishing Your Screener
Section titled “7. Publishing Your Screener”The Publish tab is where you deploy your screener to a publicly accessible URL that you can share with end users.
To publish your screener:
Select Deploy Screener. BDT will package your current form and eligibility logic and make them available at a public URL. The URL is displayed on the Publish tab after the first deployment.
The Publish tab shows:
- Screener URL — the public link where end users can access and submit the screener
- Last Published Date — the date and time of the most recent deployment
Deploying your screener publishes a snapshot of the current form and benefit configuration. Subsequent edits to the form or eligibility logic are not reflected at the public URL until you deploy again.
If you update your screener after publishing, return to the Publish tab and select Deploy Screener again to push the updated version to the public URL.